Hi dear readers !
No polish today, but I'll need a little attention from you, my fellow readers !
This August, I'll be on holiday for two weeks. During that time, I don't want to leave my blog (and you) all alone, so there will be guest posts all along.
I'd also like to make some quick interviews with you, and let you show "the best of you", your favorite/best manicure from all time, the manicure that makes you proud when you think of it.
If you wish to particpate, it's easy, just answer the quick questions listed below, and send me a mail with your answers and at least one picture of the manicure that you are proud of. It can be shown on nails or fake nails or wheel, but it has to be your work. If it was inpired by someone else, please mention it.
You don't have to have a blog to enter.
If you are a guest blogger for me in august, you can still participate here.
Form is closed, thanks to all of you who sent me their answers and pics !
Here are the questions !
1. Where are you from ?
2. When did your love for polish started, and how ?
3. How many polish do you own ?
4. Who or what inspires you ?
5. What are your favorite nail polish blogs ?
6. Do you have a blog ? Please provide it's url
7. What is your favorite part in blogging ? If you don't have a blog, what stops you from making your own ?
8. Funny and non-polish related question, are you a cat or a dog person ? :D
Finally, show us your best manicure work !
I hope you'll enter this special post series, and you'll like it :)
Have a nice day :)


Thursday, June 28, 2012
Wednesday, June 27, 2012
OPI DS Illuminate
Hi dear readers !
I rarely post swatches, but this is a true wonder ! I got OPI DS Illuminate a few weeks ago and had to wear it, even if it's not really a summer shade.
DS Illuminate is a light brown with holographic flecks in it. It's really beautiful, very sparkly and attractive. It's also a dream to apply :)
I used two coats, no top coat for these pics.


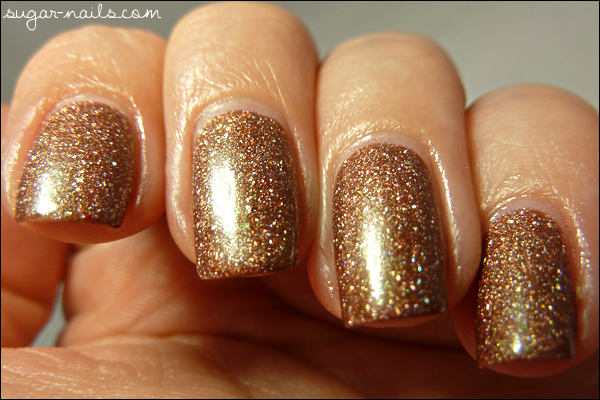 The last pic is a bit blurry but you can see the holo goodness better. You can also see the green flash it has, but it's more noticeable in the bottle than on the nails.
I had some trouble taking pics of this one, guess why ?
I had a little guest installed in the lightbox and she didn't want to move ! I had to take her out - and cuddle her a lot - so I could go back to the pics :)
Meet my little Tiger !
 Now you understand why I often have cat hair on my hands ...
So, do you like the polish ? Have you tried it, or other colors from the DS Series ?
Have a nice day :)
I rarely post swatches, but this is a true wonder ! I got OPI DS Illuminate a few weeks ago and had to wear it, even if it's not really a summer shade.
DS Illuminate is a light brown with holographic flecks in it. It's really beautiful, very sparkly and attractive. It's also a dream to apply :)
I used two coats, no top coat for these pics.
I had some trouble taking pics of this one, guess why ?
I had a little guest installed in the lightbox and she didn't want to move ! I had to take her out - and cuddle her a lot - so I could go back to the pics :)
Meet my little Tiger !
So, do you like the polish ? Have you tried it, or other colors from the DS Series ?
Have a nice day :)
Labels :
Brown,
Holographic,
OPI

Monday, June 25, 2012
Review: Born Pretty Store Water Decals
Hi dear readers !
I hope you're fine ! My week is going to be very calm and I'll have more free time to read your blogs and prepare stuff for my own as I took one week off work to rest :) I'm not going anywhere, I'll just stay at home and enjoy that week with my bf and the kitties! The real holiday will be in august ;)
On to today's post ! Again, Kevin from Born Pretty Store asked me if I'd like to review some thing from their great shop. This time I chose to review water decals, as it's a something I like a lot (but use to rarely imo haha)
They have a large choice of water decals, from flowers and lace to cute characters like Hello Kitty, Snoopy ... Everyone should find something they like.
I got the Flowers and Butterflies patterns, I've always loved that sweet and cute style. I got a sheet of no less than 133 decals, which makes a lot for the price: 2.99$, free shipping.
There are silver butterflies in different styles, flowers and very pretty arabesques. Here's a view of the whole thing:
 Water decals are very easy to use. There are instructions on the back of the pack, but I think they have been translated from Chinese with something like Google Translator, and some sentences are funny or have no sense.
If you never used water decals before, here are the instructions:
- Paint your nails with the desired color and let dry
- Cut the desired pattern from the water decals sheet and soak it into room temperature water for 20 seconds
- Remove carefully the water decal from the paper with tweezers and place it on the nail. As long as it is wet, you'll be able to move the decal until you find the look that you want
- Tap a paper towel gently on the nail until it's fully dry. At this moment, the decal will be stuck on the nail and won't move anymore
- Finish with top coat of your choice
That's all ! It takes a little longer than simple stickers to apply but the result is much better, the water decals look like they are inlaid in the polish, there are no clear borders, neither thickness as with stickers. Here's the result:


 The last pic is overexposed but it shows the patterns better. I used two arabesques and two butterflies.
To get this result, I first painted my nails with two coats of Essence Hang Loose, then sponged with OPI Done Out in Deco. Then I applied the decals as explained before, and sealed with one coat of Seche Vite.
I love how the water decals looked, they have a foil finish and are very shiny. And they were more than easy to apply, I tried other brands that were sometimes hard to place on nails but these were simply perfect.
You can get these on Born Pretty Store for 2.99$, and other patterns are from 2.99$ to 4.73$. Click here to see all their water decals.
Shipping is always free*. Don't forget to use my code AYUUMIK31to get 10% off your order :)
*you can add a 3$ fee to your order to get an insurance with a tracking number, but it's optional.
Do you like it ? Have you ever tried water decals from BPS or another brand ?
Have a nice day :)
I hope you're fine ! My week is going to be very calm and I'll have more free time to read your blogs and prepare stuff for my own as I took one week off work to rest :) I'm not going anywhere, I'll just stay at home and enjoy that week with my bf and the kitties! The real holiday will be in august ;)
On to today's post ! Again, Kevin from Born Pretty Store asked me if I'd like to review some thing from their great shop. This time I chose to review water decals, as it's a something I like a lot (but use to rarely imo haha)
They have a large choice of water decals, from flowers and lace to cute characters like Hello Kitty, Snoopy ... Everyone should find something they like.
I got the Flowers and Butterflies patterns, I've always loved that sweet and cute style. I got a sheet of no less than 133 decals, which makes a lot for the price: 2.99$, free shipping.
There are silver butterflies in different styles, flowers and very pretty arabesques. Here's a view of the whole thing:
If you never used water decals before, here are the instructions:
- Paint your nails with the desired color and let dry
- Cut the desired pattern from the water decals sheet and soak it into room temperature water for 20 seconds
- Remove carefully the water decal from the paper with tweezers and place it on the nail. As long as it is wet, you'll be able to move the decal until you find the look that you want
- Tap a paper towel gently on the nail until it's fully dry. At this moment, the decal will be stuck on the nail and won't move anymore
- Finish with top coat of your choice
That's all ! It takes a little longer than simple stickers to apply but the result is much better, the water decals look like they are inlaid in the polish, there are no clear borders, neither thickness as with stickers. Here's the result:
To get this result, I first painted my nails with two coats of Essence Hang Loose, then sponged with OPI Done Out in Deco. Then I applied the decals as explained before, and sealed with one coat of Seche Vite.
I love how the water decals looked, they have a foil finish and are very shiny. And they were more than easy to apply, I tried other brands that were sometimes hard to place on nails but these were simply perfect.
You can get these on Born Pretty Store for 2.99$, and other patterns are from 2.99$ to 4.73$. Click here to see all their water decals.
Shipping is always free*. Don't forget to use my code AYUUMIK31to get 10% off your order :)
*you can add a 3$ fee to your order to get an insurance with a tracking number, but it's optional.
Do you like it ? Have you ever tried water decals from BPS or another brand ?
Have a nice day :)
Wednesday, June 20, 2012
OPI Black Spotted
Hi dear readers !
So today I have a polish that made a lot of noise these last days on nails blogs and Facebook groups ! OPI Black Spotted is a brand new special effect top coat, like crackle top coats, and it's a part of the Spiderman collection. The problem with it ? It's sold exclusively in France !
Thanks to the sweet french blogger Mimie Crystal, I was able to get my own bottle. But I still think it's a shame that it's only sold in France, it could have been at least an European limited edition, like there are some limited editions in the USA ... I live right next to France and it's impossible for me to get my hands on it by myself, unless I travel 200 kilometers to the nearest Sephora ... We have official OPI retailers in Belgium but they never heard about it.
I really hope they will sell it worldwide soon, or that other brands do their own "spotted" polish.
Well, enough for the rant, here's the beauty !


 This top coat works just like crackle polishes. You have to apply a (very thin) coat on your (totally) dry manicure, and you'll see the spots appear after a few seconds.
It's really more easy to use than crackles actually, the texture is very liquid, a bit oily, and the spots appear almost immediatly. The only attention point is you have to do really thin coats to get a pretty effect. I did a too thick coat on my index, you can see I have almost no spot on it.
The technique is to wipe the brush really well on the bottle.
You also have to use ot over a totally dry manicure or it will create crackles. I used Seche Vite and waited 20 minutes before I applied Black Spotted.
Finally, it dries quick on itself so you don't need a quick dry top coat. If you still want to use one, note that it will probably peel on the next day.
You can see a video of the application here: http://www.youtube.com/watch?v=YbXd9EkaE4c
It's all in french but the images are enough ;) You can push the video to 1:25 to see how it applies.
Before I forgot, I tried it here over some neons, I used Island Girl Royal Hawaiian on all nails and China Glaze Flying Dragon for the accent. I love Island Girl neons, they apply so well !
What do you think ? I like this even better than crackles ! I hope we'll have more colors, and also that it will be available worldwide one day :) (also because OPI in europe cost 13-14€/17$ and I hate buying them here ... OPI are cheaper if I get them from the USA, even with the shipping)
Have a nice day :)
So today I have a polish that made a lot of noise these last days on nails blogs and Facebook groups ! OPI Black Spotted is a brand new special effect top coat, like crackle top coats, and it's a part of the Spiderman collection. The problem with it ? It's sold exclusively in France !
Thanks to the sweet french blogger Mimie Crystal, I was able to get my own bottle. But I still think it's a shame that it's only sold in France, it could have been at least an European limited edition, like there are some limited editions in the USA ... I live right next to France and it's impossible for me to get my hands on it by myself, unless I travel 200 kilometers to the nearest Sephora ... We have official OPI retailers in Belgium but they never heard about it.
I really hope they will sell it worldwide soon, or that other brands do their own "spotted" polish.
Well, enough for the rant, here's the beauty !
It's really more easy to use than crackles actually, the texture is very liquid, a bit oily, and the spots appear almost immediatly. The only attention point is you have to do really thin coats to get a pretty effect. I did a too thick coat on my index, you can see I have almost no spot on it.
The technique is to wipe the brush really well on the bottle.
You also have to use ot over a totally dry manicure or it will create crackles. I used Seche Vite and waited 20 minutes before I applied Black Spotted.
Finally, it dries quick on itself so you don't need a quick dry top coat. If you still want to use one, note that it will probably peel on the next day.
You can see a video of the application here: http://www.youtube.com/watch?v=YbXd9EkaE4c
It's all in french but the images are enough ;) You can push the video to 1:25 to see how it applies.
Before I forgot, I tried it here over some neons, I used Island Girl Royal Hawaiian on all nails and China Glaze Flying Dragon for the accent. I love Island Girl neons, they apply so well !
What do you think ? I like this even better than crackles ! I hope we'll have more colors, and also that it will be available worldwide one day :) (also because OPI in europe cost 13-14€/17$ and I hate buying them here ... OPI are cheaper if I get them from the USA, even with the shipping)
Have a nice day :)
Labels :
Black,
China Glaze,
Island Girl,
Layering,
Neon,
OPI,
Pink,
Purple,
Spotted
Tuesday, June 19, 2012
I'm a guest at Refined and Polished !
Hi dear readers !
I was invited by Lakeisha to write a guest post on her blog, Refined and Polished, that's so great !
She published my post today, please check it here, and why not follow her if you don't know her yet !

I was invited by Lakeisha to write a guest post on her blog, Refined and Polished, that's so great !
She published my post today, please check it here, and why not follow her if you don't know her yet !
Again, thank you Lakeisha for welcoming me on your blog :D
Have a nice day ^^
Labels :
Guest Post
Monday, June 18, 2012
Pretty & Polished Jawbreaker
Hi dear readers !
Here's another polish by Pretty & Polished, I really should have done an "indie week" or "indie month" haha :)
This is Jawbreaker and I think it's one of her famous polish. It should remind you of the big candies called Jawbreaker, and she did a good ob at this !


Here's another polish by Pretty & Polished, I really should have done an "indie week" or "indie month" haha :)
This is Jawbreaker and I think it's one of her famous polish. It should remind you of the big candies called Jawbreaker, and she did a good ob at this !

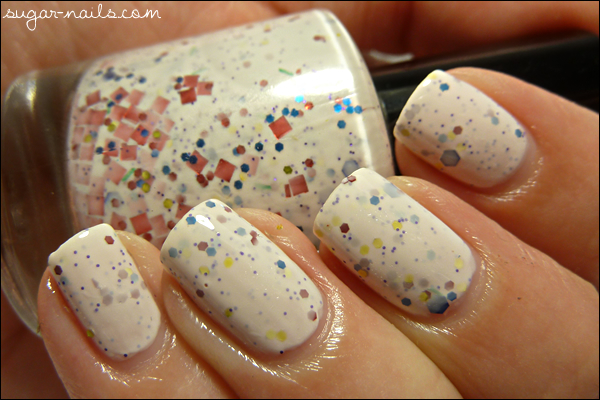
Jawbreaker is a white jelly base with yellow, red, purple, green and blue glitters in different sizes, from extra tiny to big chunks. Just like the colors of the candies :)
It also has square red glitters as you can see in my bottle, but I didn't managed to get any of these on my nails. They seem to be stuck on one side of the bottle due to the transport, so I stored it upside down in my Helmer, hoping they will mix with the rest for next time.
It's another great polish, with a glitter sandwich effect, which I love a lot ! The application was flawless, great formula to work with.
I'm really in love with that kind of polish actually, what about you ? Do you like it ?
I have a question for you, would you be interested in short posts about my favourite base, top coat, nail cares and material ? I could do that kind of posts between two polish posts, to share my experiences with you :)
Have a nice day :)
Labels :
Glitter,
Pretty and Polished,
Rainbow,
White
Sunday, June 17, 2012
Blogroll Issues
Hi dear readers !
No polish today, but a warning since there were some problems this weekend on many blogs !
It seems that there's a virus on Blogger blogs right now, and it's somehow connected with the Blogroll widget.
That's why I have temporarily removed the Blogroll from this blog, until the problem is solved.
I obviously checked my blog with Google Webmaster Tool and there's no malware here :)
If you have a blog, removing the Blogroll temporarily should be considered until the problem is solved.
If you get a malware notification from a blog you're visiting, you should warn the authors so they can suspend their blogrolls, too.
I hope this will be solved quickly, I don't like not having my Blogroll on !
Have a nice day :)
Friday, June 15, 2012
From the vault: China Glaze Classic Camel
Hi dear readers !
This will be a very quick post, it's finally friday and I'm very tired from work ... I just took a long, bubbly bath with sweet Lush products and all I want is to go slepping now haha :D
I didn't have time to edit some of my most recent pics, so I decided to show you a very old mani from last summer, which I didn't dare to show until now as I was not satisfied with it. You'll tell me your advice on it :)
I didn't have my lightbow then, so the first pic is take indoor with halogen lamp, the others were taken outdoor with natural light.


 The base is China Glaze Classic Camel, a pretty shade that doesn't suit my skintone. At all. I really didn't like it on me on it's own, so I stamped some flowers with Bundle Monster plate BM06 and a purple polish I don't remember but it looks like OPI Diva of Geneva.
Then I sponged randomly around the flowers to hide some of the Classic Camel.
It looked better on me like that but I wasn't totally satisfied with the final look. And sorry for the tip wear, at that moment I had to take my pics on the second or third day to get some sun outside ... I really love my lightbox, it makes things more easy :)
Don't get me wrong, I like Classic Camel. It's really pretty with it's shimmer, but it's just not for me. I might use it as a base for some nail art again but never as a full manicure ;)
What do you think ?
Have a nice weekend :)
This will be a very quick post, it's finally friday and I'm very tired from work ... I just took a long, bubbly bath with sweet Lush products and all I want is to go slepping now haha :D
I didn't have time to edit some of my most recent pics, so I decided to show you a very old mani from last summer, which I didn't dare to show until now as I was not satisfied with it. You'll tell me your advice on it :)
I didn't have my lightbow then, so the first pic is take indoor with halogen lamp, the others were taken outdoor with natural light.
Then I sponged randomly around the flowers to hide some of the Classic Camel.
It looked better on me like that but I wasn't totally satisfied with the final look. And sorry for the tip wear, at that moment I had to take my pics on the second or third day to get some sun outside ... I really love my lightbox, it makes things more easy :)
Don't get me wrong, I like Classic Camel. It's really pretty with it's shimmer, but it's just not for me. I might use it as a base for some nail art again but never as a full manicure ;)
What do you think ?
Have a nice weekend :)
Labels :
Beige,
Bundle Monster,
China Glaze,
OPI,
Purple,
Sponging,
Stamping
Wednesday, June 13, 2012
Candeo Colors Jelly Bean
Hi dear readers !
Again I have an indie polish for you today, Jelly Bean by Cando Colors ! I've been wanting this polish for a while, and I finally got my hands on it some days ago. Well, I still want even more Dolce, but it wasn't available when I bought Jelly Bean. Better luck next time !
Wearing Jelly Bean was very weird to me ! Officially, I hate yellow. The only time I wore that color was two years ago, when I had to review Orly Lemonade, and it was really terrible on me. I didn't know how Jelly Bean would look on me, finally I liked it but I still think it's strange to see my nails in that color. I went out with some friend while I was wearing it and there were a bit shocked, too :D


 I finally adopted it because it's not a bright, "in your face" yellow. It's very sweet and the glitter sandwich effect it great !
The base of this polish is jelly, it's very sheer in one coat but it becomes opaque with a second one, so don't worry if you hate to see vnl. It's also great to work with, it applies very easily.
I used two coats and one coat of Seche Vite for this manicure.
Do you like it ? Do you dare to wear colors you usually hate ?
I used to hate green in everything (clothes, deco ...) but since I started my polish mania, I love this color a lot and appreciate it even in non-polish stuff, so maybe one day I'll like yellow ;)
Have a nice day ^^
Again I have an indie polish for you today, Jelly Bean by Cando Colors ! I've been wanting this polish for a while, and I finally got my hands on it some days ago. Well, I still want even more Dolce, but it wasn't available when I bought Jelly Bean. Better luck next time !
Wearing Jelly Bean was very weird to me ! Officially, I hate yellow. The only time I wore that color was two years ago, when I had to review Orly Lemonade, and it was really terrible on me. I didn't know how Jelly Bean would look on me, finally I liked it but I still think it's strange to see my nails in that color. I went out with some friend while I was wearing it and there were a bit shocked, too :D
The base of this polish is jelly, it's very sheer in one coat but it becomes opaque with a second one, so don't worry if you hate to see vnl. It's also great to work with, it applies very easily.
I used two coats and one coat of Seche Vite for this manicure.
Do you like it ? Do you dare to wear colors you usually hate ?
I used to hate green in everything (clothes, deco ...) but since I started my polish mania, I love this color a lot and appreciate it even in non-polish stuff, so maybe one day I'll like yellow ;)
Have a nice day ^^
Labels :
Candeo Colors,
Glitter,
Yellow
Monday, June 11, 2012
Pretty & Polished Hello Dolly
Hi dear readers !
Today I have another beauty made by Pretty & Polished ! It's Hello Dolly, a clear base packed with white, purple, pink and holo glitters.
I was very happy with this polish ! The glitter apply evenly and you don't have to spend time placing them, or fishing for them in a bottle (but you could if you want).
The purple hexa glitters really shine like mirrors, they are stunning ! There are some very large pink glitters, I only had one on this mani but I really liked this one. I only wish there were a bit more of these, I don't see a lot in my bottle. The holo glitters are very thin and add a beautiful sparkle to the polish.


 I layered it over A England Guinevere, another great polish with a perfect application, like all the A England I've tried now.
The combo was pretty, what do you think?
I hesitated to layer it over Essie Marshmallow, then I saw how it looked on Stephanie's blog: it's very pretty too, isn't it ? Looks like some kind of sweets ... Next time I might give it a try :)
So, do you like this combo ?
Have a nice day :)
Today I have another beauty made by Pretty & Polished ! It's Hello Dolly, a clear base packed with white, purple, pink and holo glitters.
I was very happy with this polish ! The glitter apply evenly and you don't have to spend time placing them, or fishing for them in a bottle (but you could if you want).
The purple hexa glitters really shine like mirrors, they are stunning ! There are some very large pink glitters, I only had one on this mani but I really liked this one. I only wish there were a bit more of these, I don't see a lot in my bottle. The holo glitters are very thin and add a beautiful sparkle to the polish.
The combo was pretty, what do you think?
I hesitated to layer it over Essie Marshmallow, then I saw how it looked on Stephanie's blog: it's very pretty too, isn't it ? Looks like some kind of sweets ... Next time I might give it a try :)
So, do you like this combo ?
Have a nice day :)
Labels :
A-England,
Glitter,
Layering,
Pretty and Polished,
Purple
Friday, June 8, 2012
How I cured my polish sorting OCD ...
Hi dear readers !
So, yes, I have a sorting OCD when it comes to my hobbies ! I was obsessed with storage boxes when I used to make beaded jewelry, and it continues with my passion for polish and nail art !
I have two Helmers from Ikea for the polish bottles (three drawers are for care stuff and frankening material, the rest is filled with polish) and started to make wheels not so long ago, but I wasn't satisfied. Wheels are pretty when sorted by color, but you can't compare easily, you can't find complementary colors easily neither, and it's very frustrating when a color wheel is full and you have ONE polish to add ...
So I saw this post by Emily, and this one by Gnarly Nails, and so my life changed !
I already knew about those pretty plastic sticks you can put on a stand or bind together to make swatches, but for a collection such as mine, it would cost too much, and some Ebay vendors don't even ship them to Belgium.
The cheap DIY version is pretty to look at and doesn't cost a lot :)
All you need is popsicle sticks, false nails, glue and a pen to write the names on your swatchicles !

 Actually my swatchicles
 sleep in shoe boxes, but I'll move in october, I'll have more space and I'll find another way to store them. I found great cardboard boxes at Ikea, they are perfect for my swatchicles and pretty ;)
I won't explain how to create them, as Emily already did it very well and her English is better than mine, but here are some tips I can give you from my own experience:
- Use a glue gun. A glue gun is not really expensive, you will reuse it for other DIY projects, it's very easy and handy to use and the glue dries fast so you can start painting not too long after you created the swatchicles. The only thing you have to care for is to wait a few seconds before sticking the false tip, otherwise the glue will be to hot and the tip will melt.
- Make trials with your pen. I bought a felt tip marker just for these but it bleed on the wood. Finally an old CD marker was what worked the best for me !
- Don't forget a base for your crackle polishes. I used a white base for mine, but you can use a clear polish.
- I didn't add top coat to mine. I know some girls prefer tp do it, but I didn't want to alter the final look of my polishes. I talked about that with Emily, she had her swatchicles without top coat for months and the color didn't change or fade. Mine are two months old and they still look perfect.
- Allow the polish to dry for 24 hours. That's a very important part, if you store them too soon, they will stick together, sometimes causing irreparable damages.
After I was done with my whole collection, I sorted them in clear plastic cups by color. I also separated the glitters and holos. That lets me sort my Helmer drawers by brand !
Want to see more of my swatchicles ? Let's go !


Don't forget to make some additional swatchicles so you can swatch your new babies as soon as you get them !
Here is what they look like without polish:
 The color of the false tips I chose is "natural" but you can get them in white or clear. In my opinion, the natural or clear ones will give you a better preview of sheer colors.
While I was doing that, I decided to add color labels to my polish bottles. That idea also came from Emily, you can see her post here.
I used 8mm vinyle dots, painted them and stick them on the bottle caps. They look perfect on bottles with a flat top but they tend to curl a bit on rounded caps, or those with a relief like China Glaze. But the main purpose was to see the colors without having to remove all the bottles and search through them, so I'm very glad of the result !
I think every collection over 100-200 polishes should start swatchicles to help sorting and comparing them. With my 700+ collection, it's totally helpful and I want to play more with my colors, as they are more easy to find. Now my drawers can stay well organized, I don't have to move a dozen of bottles to find what I want when I paint my nails :D
I hope you liked this post ! Do you have swatchicles or plan to make yours ?
If you have any question, feel free to ask in the comments section :)
Thanks for watching ^^
have a nice day :)
So, yes, I have a sorting OCD when it comes to my hobbies ! I was obsessed with storage boxes when I used to make beaded jewelry, and it continues with my passion for polish and nail art !
I have two Helmers from Ikea for the polish bottles (three drawers are for care stuff and frankening material, the rest is filled with polish) and started to make wheels not so long ago, but I wasn't satisfied. Wheels are pretty when sorted by color, but you can't compare easily, you can't find complementary colors easily neither, and it's very frustrating when a color wheel is full and you have ONE polish to add ...
So I saw this post by Emily, and this one by Gnarly Nails, and so my life changed !
I already knew about those pretty plastic sticks you can put on a stand or bind together to make swatches, but for a collection such as mine, it would cost too much, and some Ebay vendors don't even ship them to Belgium.
The cheap DIY version is pretty to look at and doesn't cost a lot :)
All you need is popsicle sticks, false nails, glue and a pen to write the names on your swatchicles !
I won't explain how to create them, as Emily already did it very well and her English is better than mine, but here are some tips I can give you from my own experience:
- Use a glue gun. A glue gun is not really expensive, you will reuse it for other DIY projects, it's very easy and handy to use and the glue dries fast so you can start painting not too long after you created the swatchicles. The only thing you have to care for is to wait a few seconds before sticking the false tip, otherwise the glue will be to hot and the tip will melt.
- Make trials with your pen. I bought a felt tip marker just for these but it bleed on the wood. Finally an old CD marker was what worked the best for me !
- Don't forget a base for your crackle polishes. I used a white base for mine, but you can use a clear polish.
- I didn't add top coat to mine. I know some girls prefer tp do it, but I didn't want to alter the final look of my polishes. I talked about that with Emily, she had her swatchicles without top coat for months and the color didn't change or fade. Mine are two months old and they still look perfect.
- Allow the polish to dry for 24 hours. That's a very important part, if you store them too soon, they will stick together, sometimes causing irreparable damages.
After I was done with my whole collection, I sorted them in clear plastic cups by color. I also separated the glitters and holos. That lets me sort my Helmer drawers by brand !
Want to see more of my swatchicles ? Let's go !
 |
| Swatchicles make it more easy to find colors that go together - or don't - and helps you to find your dupes ! |
 |
| My favorite cup, the holo family ! |
Here is what they look like without polish:
While I was doing that, I decided to add color labels to my polish bottles. That idea also came from Emily, you can see her post here.
I used 8mm vinyle dots, painted them and stick them on the bottle caps. They look perfect on bottles with a flat top but they tend to curl a bit on rounded caps, or those with a relief like China Glaze. But the main purpose was to see the colors without having to remove all the bottles and search through them, so I'm very glad of the result !
 |
| Catrice, Color Club and Nfu Oh drawer |
 |
| Essence Drawer |
 |
| OPI and Zoya Drawer |
I hope you liked this post ! Do you have swatchicles or plan to make yours ?
If you have any question, feel free to ask in the comments section :)
Thanks for watching ^^
have a nice day :)
Version Française - Cliquez ici
Hello !
Alors, oui, j'ai un véritable trouble obessionnel compulsif quand il s'agit de mes hobbies ! J'étais déjà obsédée par les boîtes de rangement quand je faisais des bijoux, et ça continue avec ma passion pour le vernis et le nail art.
J'ai deux Helmers de chez Ikea pour les vernis (3 tiroirs sont consacrés aux soins et à mon petit matériel de frankening, le reste c'est que du vernis !) et j'ai commencé à peindre des roues il y a quelques temps, mais je n'étais pas satisfaite. Les roues, c'est bien joli quand c'est organisé par couleur, mais il est difficile de comparer ou d'assortir des couleurs, et c'est surtout vachement frustrant quand une roue est complète et qu'on a UN vernis à ajouter ...
Et puis j'ai découvert ce billet par Emily, et celui-ci par Gnarly Nails, et ma vie a changé !
Je connaissais déjà ces jolis tips en plastique à mettre sur un présentoir ou encore à accrocer à un anneau pour présenter les swatches, mais pour une collection comme la mienne ça coûte vraiment trop cher, et certains vendeurs Ebay ne livrent pas en Belgique ni même en Europe.
La version "do it yourself" est jolie et coûte surtout moins cher :)
Tout ce dont vous avez besoin, ce sont des bâtonnets en bois, des faux ongles, de la colle et un feutre pour écrire les noms sur vos swatchicles maison !
Pour le moment mes swatchicles sont dans des boîtes de chez Ikea, la taille convient bien, elles sont sobres mais jolies.
Les liens que je cite plus haut sont en anglais, très bien expliqué, mais je vais faire un résumé ici pour celles qui ne pratiquent pas la langue :)
Les faux ongles: on les trouve dans les ongleries ou sur le net à petit prix (Ebay ou Born Pretty Store). Les miens sont les plus larges que j'ai trouvés, adaptés pour des gros pouces on va dire. Les faux ongles pour le pouce du pied (si si!!) sont idéaux paraît-il car très larges et un peu plus courts que les miens, mais je n'en ai pas trouvé.
Attention si vous voulez quelque chose de régulier, il faudra veiller à trouver un pack avec des ongles de même taille. Chez BPS par exemple, les sets vendus comportent toutes les tailles mélangées.
La colle: il faut évidemment une colle qui n'abîme pas le plastique.
Les bâtonnets: ce sont ceux qu'on retrouve dans les glaces ^^ A acheter sur Ebay ou dans un magasin de loisirs créatifs, en Belgique on les trouve chez Ava.
Il vous suffit de coller les faux ongles sur les bâtonnets ... Avec le pistolet à colle, ça va très vite, en quelques minutes c'est sec. Il est tout de même recommandé d'attendre une heure ou deux avant de peindre évidemment. On pose deux couches de vernis, on note le nom, et voilà :)
Voici quelques astuces que j'ai retenues de mon expérience:
- Utilisez un pistolet à colle. Ce n'est pas vraiment cher, vous l'utiliserez par après pour d'autres bricolages, c'est facile et pratique à utiliser et la colle sèche très vite, ce qui permet de commencer à peindre rapidement. La seule chose à laquelle il faut faire attention est la chaleur du pistolet. Attendez quelques secondes avant de poser le tip sur le stick, sinon la colle sera trop chaude et fera fondre le faux ongle.
- Faites des essais avec votre marqueur. J'avais acheté un feutre exprès mais je me suis rendue compte qu'il dégoulinait sur le bois. Au final c'est mon vieux marqueur pour CD qui a donné les meilleurs résultats !
- N'oubliez pas de mettre une base pour vos crackles. J'ai utilisé du blanc pour kes miens, mais un vernis transparent fait tout aussi bien l'affaire..
- Je n'ai pas ajouté de top coat. Je sais que certaines bloggeuses préfèrent le faire, mais je ne voulais pas modifier l'apparence finale de mes vernis. Ca fait plusieurs mois que j'ai mes swatchicles, la couleur n'a pas changé et ne s'est pas atténuée malgré l'absence de top coat
- Laissez sécher 24 heures. C'est très important, si vous les rangez trop tôt, ils vont coller ensemble, même si la surface vous semble sèche, et tout sera à refaire.
- Mes tips sont de couleur "natural" mais on peut les trouver en blanc ou transparent également. Perso, je trouve que les vernis un peu transparents auront un rendu plus proche de la réalité sur des tips naturels ou transparents.
Après avoir "swatché" toute ma collection de la sorte, j'ai tout trié par couleurs et je les ai mis dans des gobelets en plastique (oui je sais c'est pas glam dit comme ça, mais on en trouve de jolis). J'ai aussi séparé les holos et les paillettes. Et je peux ranger mon Helmer par marques :)
N'oubliez pas de préparer quelques swatchicles en avance, histoire de pouvoir swatcher vos nouveaux précieux dès leur arrivée :)
Tant que je faisais cela, je me suis décidée à ajouter des étiquettes de couleur sur mes bouteilles pour les retrouver plus facilement. L'idée vient aussi de chez Emily, vous pouvez lire son post ici.
J'ai utilisé des ronds autocollants en vinyle de 8mm, j'ai posé un peu de vernis dessus et une fois secs, je les ai collés sur les bouchons des flacons. Ils sont parfait sur les bouchons plats, mais sur ceux qui sont courbés ou qui ont un relief comme les China Glaze ou OPI, ils ont tendance à se recourber. L'idée principale était de pouvoir reconnaître une couleur en un clin d'oeil, sans farfouiller les tiroirs, donc ça me convient comme ça :p
Je pense que tout collection qui dépasse les 100-200 vernis devrait se mettre aux swatchicles, c'est vraiment génial pour comparer plusieurs vernis ou trouver ceux qui se marient bien entre eux. Avec ma collection de plus de 700 flacons, ça aide énormément et ça m'inspire à jouer avec plus de couleurs vu qu'elles sont plus faciles à trouver. Et puis mes tiroirs restent bien rangés, je ne dois plus sortir une douzaine de vernis quand je cherche ce dont j'ai besoin :D
J'espère que vous avez aimé ce biller ! Est-ce que vous avez des swatchicles, ou vous prévoyez d'en faire ?
Si vous avez des questions , n'hésitez pas à les poser :)
Merci d'avoir regardé !
Labels :
Stash,
Swatchicles,
Tips
Friday, June 1, 2012
Pretty & Polished Sand Art
Hi again :)
I promised you to show some of the Pretty & Polished I received this week, so let's start with Sand Art !
That polish was love at first sight. It's made of tiny matte glitters, like the ones you can find in Floam. In fact, the turquoise and yellow glitters from both these polishes seem to be identical, but I haven't tried Floam yet.
In Sand Art, you'll find turquoise and yellow glitters as I said, but also pink, purple and blue glitters. And it makes a really pretty combo !


 As I had no idea how it would look once on the nails, I first did a base with two coats of Essie Marshmallow, but Sand Art was opaque with two coats and the base wasn't necessary (unless you want more loose glitters and apply only one coat). I topped with one coat of Seche Vite.
The application was very easy, I didn't have to clean the contours and only had one or two lost glitters on my cuticles. I was very scared of the removal but with the foil technique, it was very easy ! (in fact, one of the most easy glitter polish I had to remove, nothing was left on the nails)
I'm very glad I bought this polish, it's gorgeous, and a must have if you like that kind of glitter polish (I like to call them "Floamy polish" as Floam was the first polish of that kind I knew)
What do you think ? Do you like it ?
Oh, this post is a good occasion to show you my swatchicles for Pretty & Polished polishes I have. I've been working on my swatchicles last month, got my whole collection swatched, and I'm very glad with them, it's so easier to pick a polish now !
I'll make a post dedicated to them later, but for now here are my P&P polishes:
Have a nice day :)
I promised you to show some of the Pretty & Polished I received this week, so let's start with Sand Art !
That polish was love at first sight. It's made of tiny matte glitters, like the ones you can find in Floam. In fact, the turquoise and yellow glitters from both these polishes seem to be identical, but I haven't tried Floam yet.
In Sand Art, you'll find turquoise and yellow glitters as I said, but also pink, purple and blue glitters. And it makes a really pretty combo !
The application was very easy, I didn't have to clean the contours and only had one or two lost glitters on my cuticles. I was very scared of the removal but with the foil technique, it was very easy ! (in fact, one of the most easy glitter polish I had to remove, nothing was left on the nails)
I'm very glad I bought this polish, it's gorgeous, and a must have if you like that kind of glitter polish (I like to call them "Floamy polish" as Floam was the first polish of that kind I knew)
What do you think ? Do you like it ?
Oh, this post is a good occasion to show you my swatchicles for Pretty & Polished polishes I have. I've been working on my swatchicles last month, got my whole collection swatched, and I'm very glad with them, it's so easier to pick a polish now !
I'll make a post dedicated to them later, but for now here are my P&P polishes:
 |
| Sand Art, Hello Dolly, Forest Phyhre, Jawbreaker, Bayou Blitz |
Have a nice day :)
Labels :
Glitter,
Pretty and Polished,
Rainbow
May Collage
Hi dear readers !
Here is the collage for May, I hope you enoyed the posts :)
I'll be back later tonight with some polish !
Here is the collage for May, I hope you enoyed the posts :)
I'll be back later tonight with some polish !
Labels :
Monthly Collage
Subscribe to:
Posts (Atom)