Home About Me Disclosure Nail Care Collection Contact Me Contact Me Subscribe to RSS Feed Follow me on Facebook ! Follow me on Twitter ! Follow me with Bloglovin ! Follow me on Hellocoton ! Follow me on Tumblr ! Follow me on Google+ ! Follow @sugar_nails on Instagram ! Follow me on Pinterest ! Image Map
Showing posts with label Rainbow. Show all posts

Monday, May 27, 2013

Neon Gradient

Hi dear readers !

Not so long ago, I noticed a lovely neon manicure made by Nailz Craze. It was stamped in black with one of her designs. A friend of mine loved it too and suggested me to try it with white stamping.
I accepted the challenge, and here's my manicure !


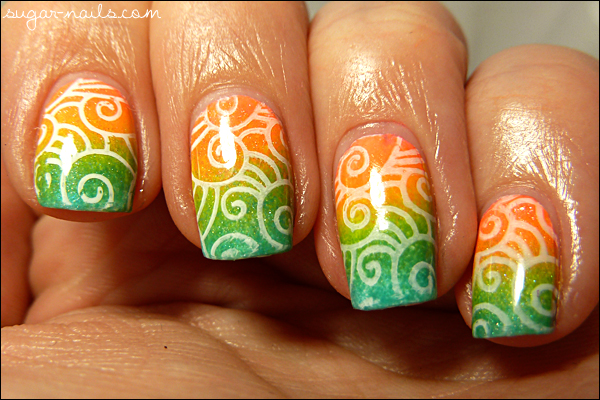
I started with a white base (China Glaze Snow) then sponged the gradient with 3 neon/bright colors: China Glaze Flip Flop Fantasy, Kiko 279 and China Glaze Towel Boy Toy.
I was really happy to see how the colors blended to create the green and orange shades ! I only regret that Flip Flop Fantasy is already a bit orange-y, so you can't see any pink in my pictures. I wish I had a beautiful neon pink for this one !

When my gradient was done, I covered it with China Glaze Wireless for a subtle bling and stamped with Nailz Craze plate NC02 and white Konad polish.

I loved it, even if it was really far from Nailz Craze's original manicure ! I would have love to have some sweet pink in mine, too ;)

What about you, do you like it ?

A quick reminder if you're interested in those fantastic plates, you can find them on Nailz Craze's Etsy shop ;)

Have a nice day :)
Version Française - Cliquez ici
Hello !

Il y a quelques temps, j'ai remarqué une chouette manucure néon réalisée par Nailz Craze. Elle y avait ajouté un stamping noir avec une de ses plaques. Une de mes amies l'a repérée elle aussi, et m'a suggéré de tester la même manucure mais avec un stamping blanc.
Challenge accepté, voici ce mon résultat !

J'ai commencé par une couche de blanc (China Glaze Snow) sur laquelle j'ai posé mon dégradé à l'éponge, avec les 3 couleurs flash/neon suivantes: China Glaze Flip Flop Fantasy, Kiko 279 and China Glaze Towel Boy Toy.
La bonne surprise, c'est que mes couleurs se sont très bien mélangées pour créer les teintes intermédiaires: l'orange et le vert. La mauvaise surprise, c'est que Flip Flop Fantasy tirant un peu sur l'orange, vous ne voyez pas ou quasi pas de rose sur mes photos :( Je regrette de ne pas avoir eu de joli rose neon pour ce nail art !

Une fois le dégradé fini, j'ai posé une couche de Wireless de China Glaze pour une touche brillante subtile, et ensuite j'ai stampé un motif de la plaque Nailz Craze NC02 avec du vernis Konad blanc.

J'ai beaucoup aimé porter cette manucure qui sent bon l'été (même si ici on en est loin, hein ><), mais j'avoue que je regrette l'absence d'un rose lumineux tout en restant doux, comme sur la manucure originale :)

Et vous, vous aimez ?

Petit rappel si ces superbes plaques vous intéressent, vous les trouverez sur le shop Etsy de Nailz Craze ;)

Bonne journée !

Wednesday, January 23, 2013

Pastel Galaxy Nails

Hi there !

I hope you're all doing well :) It's very cold now here, it gets colder and colder each day ... This morning it was -10°C, I didn't want to leave the home haha ! (but obviously, I *had*to)
My hands are suffering from this, they are totally dry, my nails started to peel and I broke three of them yesterday. I'll give them some intensive care !

I did my first galaxy nails not so long ago, and the pastel version was on my to-do list since then !
I love the pastel galaxy nails, they are so cute :)
I finally gave them a try last week, and here they are !

Sadly, it was really hard to capture, it was lovely in real life but the colors here look a bit faded :(


I'm really happy with how they looked :)
At the end of the sponging process, I didn't like it, something was missing but I didn't know what. I searched for some pastel galaxy nails on Google and found out what my problem was: most of those manicures include a hint of yellow or gold ! I added some and it really brought my galaxy to life :)

Here's what I used:
The base is OPI Rumple's Wiggin (two coats)
Sponged in the same order: China Glaze Snow, Essence Sure Azure, Essence Enchanted Fairy, Ulta Double Mint, Orly Lemonade.
I made some dots with China Glaze Snow and a thin dotting tool.
Then I sponged some medium holo glitters in random spots (Wet 'n Wild Kaleidoscope) and added one coat of China Glaze Wireless. Sealed with Seche Vite, and there it is :)

I hope you like it ! 

Bonus pic: the cast of the characters !
Have a nice day :)

Version Française - Cliquez ici
Hello !

J'espère que tout va bien pour vous ! Je ne vous apprends rien si je vous dit qu'il fait très froid ... Le thermomètre affichait -10° ce matin, je n'avais qu'une envie en sortant: rentrer de suite !! Mais évidemment, il fallait bien sortir ...
Mes mains souffrent de l'hiver, elles sont sèches, craquelées (oui, beurk), mes ongles pèlent et se dédoublent, et hier j'ai eu droit à 3 casses, rien que ça. Il est temps que je leur donne des soins intensifs !

J'ai fait ma première galaxy nails il n'y a pas si longtemps, et depuis la version pastel était sur ma to-do list !
J'adore les galaxy pastel, je trouve ça si joli :)
Finalement j'ai tenté le coup la semaine passée, et voilà le résultat !

Malheureusement j'ai du mal à photographier les couleurs pastels, c'était beaucoup plus joli en vrai, moins fade qu'en photo :(


J'ai adoré les faire, et j'ai adoré le résultat :)
A la fin de l'étape sponging, je n'aimais pas du tout, il manquait quelque chose sans que j'arrive à mettre le doigt dessus. J'ai fait quelques recherches sur Google et j'ai trouvé ! La plupart des manucures galaxy pastels contiennent une petite touche de jaune ou de doré ! J'en ai ajouté et tout de suite, ma galaxy a pris vie :)

Voici ce que j'ai utilisé:
En base, deux couches d'OPI Rumple's Wiggin 
Pour le sponging, dans le même ordre: China Glaze Snow, Essence Sure Azure, Essence Enchanted Fairy, Ulta Double Mint, Orly Lemonade.
J'ai ajouté quelques points au dotting tool fin avec China Glaze Snow.
Puis j'ai mis quelques touches de paillettes holo à l'éponge (Wet 'n Wild Kaleidoscope) et terminé avec une couche de Glaze Wireless. Un petit coup de Seche Vite et c'est fini :)

J'espère que vous aimez !
En bonus, une photo du casting :)

Bonne journée :)


Wednesday, January 16, 2013

Rainbow Gradient Skittles

Hi dear readers !

Wow, the weather became so cold here these last days ! I hate that :( Yesterday it has been snowing a lot, driving the car was complicated, now it's -5°C, which could be worst, I know, but I really can't wait for the winter to be over !

I needed some bright colors to forget about the weather !
I think rainbow skittles are a classic, so it was about time to give it a try :)


 On the second day I wanted even more fun in this mani so I added one coat of Sticks 'n Stones :)

I tried to show my thumb on the third pic as it has different colors, but it's not a really pretty pic. I just can't do the "claw"pose to show all my nails at once, I don't know why but it hurts ! My hands were not made for this pose I guess (yet my fingers are flexible haha)

So, to achieve this gradient, I used 6 colors sponged differently on each nail, in a rainbow pattern:
Mavala Rose Bonbon (pink)
Kiko 356 (orange)
OPI The It Color (yellow)
Yes Love 116 (green)
Flormar N002 (blue)
Catrice Lucky in Lilac (purple)

For Cover Band Sticks 'n Stones, I didn't apply it normally but dabbed it so I could get the glitters where I wanted them.

I took a picture of the polishes used together on my swatchicles, they looked pretty alltogether :)
I hope you liked it ! Tell me what you think of these nails :)

Do you like the swatchicle pic ? Do you think it could be useful when I post nail arts ?

Have a nice day :)
Version Française - Cliquez ici
Hello !


Pfiou, il fait si froid depuis quelques jours ! Je déteste ça :( Hier il a beaucoup neigé, sortir en voiture était très compliqué, et maintenant il faut -5°, alors certes ça pourrait être pire, mais moi j'attends déjà impatiemment la fin de l'hiver !

Il me fallait quelque chose qui flashe un peu, des couleurs joyeuses pour contrer tout ça !
Les Rainbow Skittles sont un classique je pense, il était temps que j'essaie :)


J'essaie de montrer mon pouce dans la 3ème photo vu qu'il a des couleurs différentes, mais c'est pas top. Je n'arrive pas à faire la "pose griffes". Je ne sais pas pourquoi, mes doigts sont pourtant assez souples mais cette pose me fait limite mal donc ça rend pas terrible en photo.

Pour le gradient, j'ai utilisé 6 couleurs appliquées à l'éponge différemment sur chaque ongle, pour créer un arc-en-ciel.
Mavala Rose Bonbon (rose)
Kiko 356 (orange)
OPI The It Color (jaune)
Yes Love 116 (vert)
Flormar N002 (bleu)
Catrice Lucky in Lilac (violet)

Le second jour j'au ajouté une couche de Cover Band Sticks 'n Stones pour encore plus de fun. Je ne l'ai pas appliqué normalement, j'ai plutôt tapoté le pinceau pour placer les paillettes comme je le voulais.

J'ai aussi pris une photo des vernis utilisés avec mes swatchicles, je trouvais l'ensemble joli :)


Qu'en pensez-vous ?
Et les swatchicles en photo, vous pensez que ça peut être utile de les voir pour mes autres nail arts ?

Bonne journée :)


Monday, September 17, 2012

MSMD: Rainbow Kaleidoscope

Hi dear readers !

Let's do another Monkey See, Monkey Do today !
When I came back from holiday, I saw this manicure made by the french Blogger Lubie Compulsionnelle. I totally fell in love with it, so I had to do something similar to hers :)

I didn't have the same plate, it would have looked better, but I used a repetitive pattern that still worked.


You can guess I used a lot of colors for these nails ...
First I applied one coat of China Glaze Snow to make an even base. Then I sponged the following colors:
China Glaze Spontaneous
Essence Love This City
Kiko 279
Flormar 429
The last color I used is a blue but I applied too much yellow on my tips and it turned green. Still pretty :)
Finally I stamped a pattern from Red Angel plate RA105 with my usual black Konad polish.

What do you think ? I hope you like it ... And I should do rainbow nails more often, right ? ;)

Have a nice day :)

Version Française - Cliquez ici
Hello !

J'ai un autre Monkey See Monkey Do ce lundi !
Quand je suis rentrée de vacances, une des premières photos sur lesquelles je suis tombée était cette manucure réalisée par Lubie Compulsionnelle. J'en suis tombée complètement amoureuse et j'ai eu très envie de faire quelque chose de semblable :)


Je n'ai pas la plaque de stamping qu'elle a utilisée, ça aurait rendu encore mieux, mais j'ai utilisé un autre motif répétitif et c'était sympa aussi.

Comme vous pouvez le deviner, j'ai utilisé beaucoup de couleurs cette fois ...
J'ai d'abord posé une couche de Snow de China Glaze pour créer une base régulière. Ensuite j'ai appliqué ces couleurs à l'éponge:

China Glaze Spontaneous
Essence Love This City
Kiko 279
Flormar 429
Le dernier est censé être un bleu mais j'ai mis un peu trop de jaune, donc il a viré au vert. Pas grave, c'est sympa aussi !
Pour finir, j'ai stampé le motif d'une plaque Red Angel RA105 avec mon vernis Konad noir habituel.

Qu'en pensez-vous ? J'espère que vous aimez ... Je devrais faire plus d'arc-en-ciels sur mes ongles ! :D

Bonne journée !

Wednesday, August 22, 2012

Guest Post: Jenni from Gold Speck Nails

Hi dear readers :)

It's time for a new guest post, and today we welcome Jenni from Gold Speck Nails !


Hi Sweet Sugar readers!

I’m Jenni from Gold Speck Nails. When Gwenn asked me to be a guest poster here for while she’s on holiday I was more than happy to accept. I love Gwenn’s blog, she is so talented!
For today's mani I wanted to try something new. So I started with a white base than dabbed on colours and used a large brush and acetone to create a watercolour effect. Then I stamped with my Dashica Big SpD-A plate with Konad Special Polish in White. It's quite hard to see that stamp in real life, they kind of just look like a random multi coloured pattern instead of flowers. But I still like the effect.


Here's what I used:
Base Coat: La Femme
Base Colour: Rimmel - White
Other Colours: Models Own - Slate Green
Deborah - Turquoise Fever
Kiko - 356 - Melon
Essence - Colour3 - Shopping Trip In Soho
Barry M - Berry Ice Cream
Stamping Colour: Konad Special White
Image Plate: Dashica Big SpD-A
Top Coat: Rimmel - 60 Seconds Clear

For the last photo I added a coat of Rimmel – Matte Finish top coat :]

Wow that was a big list! I hope you like it! & Gwenn, thank you so much for having me, and I hope you're having a good holiday! :]


Thank you a lot Jenni ! Wow I absolutely love that look, and the pattern you used for stamping. I love hibiscus flowers ! I need that plate ;)

Do you like it ?

Have a nice day :)

Version Française - Cliquez ici
Hello :)

C'est le moment pour un nouveau guest post ! Aujourd'hui nous accueillons Jenni du blog Gold Speck Nails !


Bonjour, lectrices de Sweet Sugar !

Je suis Jenni de Gold Speck Nails. Quand Gwenn m'a proposé d'être son invitée le temps d'un billet pendant qu'elle est en vacances, j'étais plus que contente d'accepter. J'aime son blog, elle est douée !
Pour la manucure d'aujourd'hui, je voulais essayer quelque chose de nouveau. J'ai commencé avec une base blanche, puis j'ai appliqué quelques touches de couleurs, et j'ai utilisé un pinceau large et de l'acétone pour faire un effet watercolor. Ensuite j'ai stampé avec ma plaque Dashica Big SpD-A et du vernis spécial Konad blanc. C'est assez difficile à voir en réalité, ça ressemble plus à un motif multicolore qu'à des fleurs. Mais j'aime l'effet malgré tout.


Voici ce que j'ai utilisé:
Base: La Femme
Couleur de base: Rimmel - White
Autres couleurs: Models Own - Slate Green
Deborah - Turquoise Fever
Kiko - 356 - Melon
Essence - Colour3 - Shopping Trip In Soho
Barry M - Berry Ice Cream
Stamping: Konad Special White
Image Plate: Dashica Big SpD-A
Top Coat: Rimmel - 60 Seconds Clear

Pour la dernière photo, j'ai ajouté une couche de top coat Rimmel – Matte Finish :]

Wow, la liste est longue ! J'espère que ça vous plaît ! Gwenn, merci de m'avoir invitée, j'espère que tu passes de bonnes vacances! :]


Merci beaucoup Jenni ! J'adore ce look, et le motif utilisé pour le stamping. J'aime beaucoup les fleurs d'hibiscus ! Je veux cette plaque maintenant ;)

Qu'en pensez-vous ?

Bonne journée :)

Monday, June 18, 2012

Pretty & Polished Jawbreaker

Hi dear readers !

Here's another polish by Pretty & Polished, I really should have done an "indie week" or "indie month" haha :)

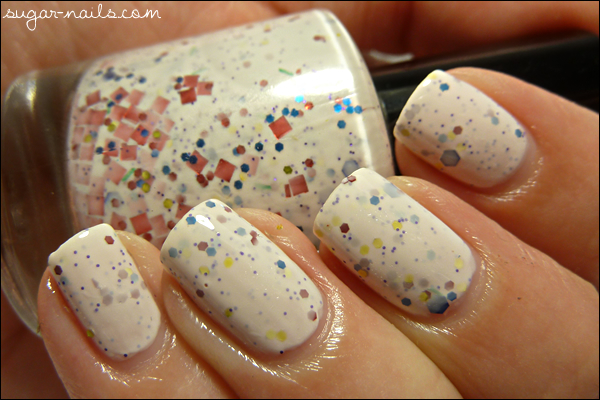
This is Jawbreaker and I think it's one of her famous polish. It should remind you of the big candies called Jawbreaker, and she did a good ob at this !


Jawbreaker is a white jelly base with yellow, red, purple, green and blue glitters in different sizes, from extra tiny to big chunks. Just like the colors of the candies :)

It also has square red glitters as you can see in my bottle, but I didn't managed to get any of these on my nails. They seem to be stuck on one side of the bottle due to the transport, so I stored it upside down in my Helmer, hoping they will mix with the rest for next time.

It's another great polish, with a glitter sandwich effect, which I love a lot ! The application was flawless, great formula to work with.

I'm really in love with that kind of polish actually, what about you ? Do you like it ?

I have a question for you, would you be interested in short posts about my favourite base, top coat, nail cares and material ? I could do that kind of posts between two polish posts, to share my experiences with you :)

Have a nice day :)

Friday, June 1, 2012

Pretty & Polished Sand Art

Hi again :)

I promised you to show some of the Pretty & Polished I received this week, so let's start with Sand Art !

That polish was love at first sight. It's made of tiny matte glitters, like the ones you can find in Floam. In fact, the turquoise and yellow glitters from both these polishes seem to be identical, but I haven't tried Floam yet.

In Sand Art, you'll find turquoise and yellow glitters as I said, but also pink, purple and blue glitters. And it makes a really pretty combo !


As I had no idea how it would look once on the nails, I first did a base with two coats of Essie Marshmallow, but Sand Art was opaque with two coats and the base wasn't necessary (unless you want more loose glitters and apply only one coat). I topped with one coat of Seche Vite.

The application was very easy, I didn't have to clean the contours and only had one or two lost glitters on my cuticles. I was very scared of the removal but with the foil technique, it was very easy ! (in fact, one of the most easy glitter polish I had to remove, nothing was left on the nails)

I'm very glad I bought this polish, it's gorgeous, and a must have if you like that kind of glitter polish (I like to call them "Floamy polish" as Floam was the first polish of that kind I knew)

What do you think ? Do you like it ?

Oh, this post is a good occasion to show you my swatchicles for Pretty & Polished polishes I have. I've been working on my swatchicles last month, got my whole collection swatched, and I'm very glad with them, it's so easier to pick a polish now !
I'll make a post dedicated to them later, but for now here are my P&P polishes:
Sand Art, Hello Dolly, Forest Phyhre, Jawbreaker, Bayou Blitz

Have a nice day  :)

Tuesday, November 22, 2011

Kleancolor Chunky Holo Black

Hi dear readers !

Not so long ago, I ordered almost every "Chunky Holo" polish from Kleancolor ! These are opalescent glitters suspended in a colored sheer base. The most impressive of them all is for sure Chunky Holo Black, which also contains big hexagonal opal glitter (instead od only small ones).

The base is a very sheer black, so the best is to use it over black, or another color. In this case, the color will be a bit darkened, like smoked, but not too much.

Here's how it looked over my last manicure, Misa Toxic Seduction:


Wow ... This polish is absolutely crazy ! I love the reflects on the third pic ... I cound't stop to stare at my nails under different lights when i wore it :)

I also think that Misa Toxic Seduction with Chunky Holo Black on it looked even more toxic, like a dirty dark green ... I liked that a lot :) But I still need to try Chunky Holo Black over other colors, especially purple :)

If you want to know where to find Kleancolor polish, I bought mine on BeautyJoint, where they only cost 1.75$ :)
They have a great range of classic and metallic colors, stunning glitters in all shapes and styles, some pretty scattered holos, and of course the Chunky Holo series.

Beyond the price and the magical colors is a flaw ... They smell terribly bad, if you ever tried acrylic nails, it's something like that ... If you're sensitive to strong scents, then you might want to wear a mask to use them. And they take years to dry. Even with Seche Vite, you have to be careful for a moment before it dries.
But believe me, it's worth it :)

Do you like it ? Have you also tried some Kleancolor shades ?

Have a nice day ^^